6.30.2011

I'm in love with a stripper

And not the Chippendale kind. Or the kind T-Pain sings about. Nope, I'm talking about the kind who made our linen closet door look like this:


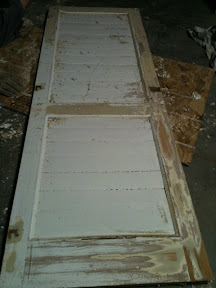
We've literally been elbow-deep in bathroom painting this week, trying to finish the bathroom remodel we started several months ago (see Involuntary Bathroom Remodeling Part I and Part II and stay tuned for Part III). Last night, as I was painting around the linen closet, I asked Joe if he thought it would be easier to just take off the closet door so I could paint around it. He agreed that would work best, took the door off, and took it out to the garage to get it out of the way. I thought that was the end of it. Next thing I knew, in Joe's typical let's-take-this-to-the-next-level fashion, he was back inside explaining to me that the door really needed to be stripped, primed, and re-painted and telling me that he'd already scraped all the paint off the perimeter of the door. OK then. I guess we're stripping and re-painting the linen closet door. This is similar to the way he had to take off a little bathroom trim to put in the tiled shower, then decided that needed to be stripped, then decided that the rest of the trim also needed to be removed and stripped, and now has decided that the trim around the doors needs to be removed and stripped...you get the idea. Now, a huge part of this bathroom project involves removing, stripping, priming, reattaching, and repainting trim *insert huge sigh and "will this ever end?" facial expression here*.

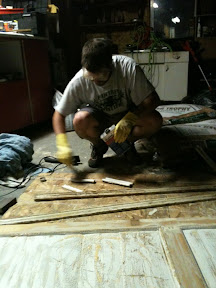
So I'm officially in love with a stripper. And, no, he's not the Chippendale kind. But I think he's pretty cute, don't you?


- Posted using BlogPress from my iPhone

6.20.2011

Home Improvement FAIL

After a bit of downtime on our home improvement, I figured tonight was a good time to continue work on our bathroom project.  In particular, we need to paint the ceiling.  I prepped the area, then went to the garage to get the big bucket o' paint.  I picked it up, and realized that there was a leak and that goopy white paint was now on my concrete garage floor.  Thanks a lot, Home Depot.

Undeterred, I figured that, instead of painting, I would continue removing the trim from the baseboard.  I went to go pry off a small piece in the corner, and in all the pulling, twisting, and bending, my 3" putty knife--probably my second-favorite home improvement tool behind my 1.5" putty knife--snapped in half.*

  *Yes, not only do I have a favorite home improvement tool, but a top 5 list regarding same.  The order: 5. Lineman's pliers, 4. Rotary sander, 3. Circular saw, 2. See above, 1. Ditto.  I love me a good putty knife.  I can't believe I'm actually saying (writing?) this out loud.

To top it all off, as I write this Kendra is outside trying to fix a leaking hose in our hand-pump sprayer-thingy to spray the weeds in our gravel driveway and patio.  This is one of those days when I think I should rename the blog, "F*ck This Old House."  Cocktail, anyone?

6.02.2011

Follow-up to yesterday's post: our first tomato of the season

I discovered this little guy today.


Our first tomato of the year. A Cherokee Purple heirloom.

It's official. Summer is here.

- Posted using BlogPress from my iPhone

6.01.2011

How does your garden grow?

This is my garden.


If you would have told Kendra from 4 years ago that she would have a garden, she would have laughed in your face. As I've mentioned before, Kendra from 4 years ago couldn't even keep a house plant alive and had never so much as dug a hole in the ground. Now she has a garden. With green things growing in it. I'll be damned.

It's not much - probably just about 6 by 12 feet or so - but it's enough for 3 tomato plants, 3 cherry tomato plants, 4 heads of lettuce, 4 heads of broccoli, 5 various pepper plants, and some spring onions this year. More than enough for our little family of four.

This is the third summer I've had a garden, and I've learned a little bit every year. The first year, I learned you can love your garden a little too much. I watered my tomato plants every 1-2 days, and ended up with huge, green, vine-y plants but very little fruit. Last year, I learned that little cages (and some putrid spray called "liquid fence") are necessary to keep rabbits and raccoons from snacking on young plants. The plants were salvageable, but I ended up with some plants that didn't produce any peppers until very late in the season.

This year is off to a great start. I've watered (but not too much), applied the liquid fence, and protected most of the plants with cages. The spring onions are almost ready, everything is growing, and we even have a tiny pepper growing on one of our jalapeño plants.

No it's not much, but I've grown pretty proud of this little sliver of our yard. And one of the best parts is that Max enjoys helping in the garden, so it's something we can do together. I hope Charlie will be able to start getting his tiny hands dirty next summer. It's perfect, really, because I've found that gardening is a lot like parenting: full of hope & frustration, surprise & disappointment, exhaustion & reward. You sow the seeds not knowing what you're gonna get, but you tend those little plants the best you can.  When you mess up, you hope the damage is reversible.  And you learn as you go.

Kendra from 4 years ago would be amazed at what it's all become.


- Posted using BlogPress from my iPad

5.25.2011

There's A Hole in the Ceiling Because I'm Fixing It...

...thanks for asking, Kendra. I did start out this project as simply covering an air return between the bathroom and the playroom. One I got on the ladder and started checking things out, though, I realized we had some old water damage to the bathroom ceiling. I got to removing the damaged plaster, and soon my 12"x10" hole was now about 3'x2'. So, in all, your typical old house project that starts out small and gets bigger and bigger.

In any event, the hole has been patched with drywall, taped, and has a coat of joint compound on it. By the weekend, it should be ready to paint, which is the whole reason I was up on the ladder in the first place.

With the ceiling painted, we can move to the walls, then the trim. Except I'm pretty sure I'm going to pop all that trim off the wall, strip it, and repaint it. Stay tuned.

5.24.2011

Why is there a hole in my bathroom ceiling?

So sometime in the last 24 hours, Joe decided he needs to close up the unnecessary vent between the play room floor and the downstairs bathroom ceiling.  Perhaps he is tired of Max peeking down at him and saying, "DAAAAAAAAAAADDDDDDDDDDY!  I SEEEEE YOOOOOU!" while he's getting into the shower.  Perhaps he is worried that same thing may happen to an unsuspecting guest.  Or perhaps he is truly hell-bent on NEVER finishing this bathroom project  Did I mention he's also taken off about half of the bathroom trim to try his hand at paint stripping? That's a post for another day...

Anyway, now there's a large hole in the bathroom ceiling where the vent used to be, pieces of plaster all over the floor, and some sort of horrible power tool screaming from behind the bathroom door.  I'm hoping it doesn't wake the boys.  I'm hoping he has enough drywall and/or whatever else he needs to get it patched tonight.  And I'm hoping Joe is documenting this to blog about later.

Good night, Peaches readers.

5.13.2011

What we've been doing instead of working on the house (and blogging)

Life is moving fast.  Max wrapped up soccer last night and his last day of preschool (for this year) was yesterday morning.  All of the sudden, Charlie is seeming less like a baby and more like a little boy - eating table food with his 4 (almost 5) teeth, trying to crawl, and even pulling himself up to standing at the coffee table a couple of times.  I decide it's time to update the blog, and realize we haven't been on for almost a month.  Wait a minute - didn't I just post that bit about landscaping, like, yesterday?!?  Slow down, time!  Honestly, there's not been much to post as far as the house goes.  Our lives have been too busy for home improvement and blogging.  So here's all the non-house related stuff we've been up to (in no particular order):

1. Baseball-ing

The boys in blue are off to a good start.
Is this the Royals' year?
The now annual Gagnon-Bryant-Meyer
Easter backyard baseball game.
Max perfects his home run swing.
2. Easter-ing

Max carefully dyes his eggs.

The Easter bunny was generous this year.  The boys must
have been good!
All dressed up and ready for church.
Charlie "hunts" Easter eggs.

3. Swinging

A new back yard swing = hours of fun!
Max loves to push his little brother at the park.

4. Bike riding

Max with his new set of wheels.

5. Golfing

Charlie's first trip to the course.  I did not let him drive.

Is the next Tiger Woods in this picture?
Not if they take after their parents.

6. Camping

Max's first camping trip.  I've never seen him so excited.

Joe and his boys by the campfire.
7. Marching (for Babies)

With the help of our family and friends, we raised
over $1500 for the March of Dimes in memory of Lucy.
Me and my "angel Mom" friends.

8. Soccer-ing

Ready to take the field.
Goal!

9. Spending lots and lots of time with family.

Max and Charlie with their three cousins.
They love their Nanni!
Charlie and Paw-Paw share a smile.

Time may be flying by, but we wouldn't have it any other way.  Our lives are so full, and these boys just keep getting bigger and better every day.  

Lucky them.  

Lucky us.

4.14.2011

Landscaping for dummies

Before we moved into this house, we never had a yard and I'd never tried to plant anything. Ever. I'd been given several houseplants over the years, and could never keep them alive. I figured I was hopeless.  A brown thumb.  The first year we lived here, our "landscaping" pretty much consisted of digging (ugly) stuff up and cutting (dead) stuff down. I wanted to plant something but didn't know where to start. So I hired a landscape designer to come up with a very simple beginning landscaping plan. The thought of planting something myself was overwhelming and intimidating. Then the local Garden Club had a sale and I bought a few hostas, dug some holes around the patio, put the plants in the holes, and waited. And guess what? They didn't die. So then I dug a few holes outside the back porch, put in some tomato and pepper plants, and waited. And they didn't die either. Those experiences gave me a bit of confidence, so I decided I'd try to at least get started with the landscape designer's plans. And so, for the past two years, I've slowly been adding simple elements to our landscape. With the exception of some mums and roses I planted in 2009 that didn't come back for 2010, everything is alive and - dare I say - thriving. And so, here I am, Kendra the Gardener. Who'd have thunk it? And the funniest thing about it is, I've found I actually like fooling with the green stuff.

Today, it's 75 degrees today in Northwest Missouri. The birds are singing, the trees are budding, and the grass is turning green. It's been a long, cold winter folks, and I'm itching to get my hands in some dirt and pretty up the exterior of this old house with a bit of landscaping. I'm ready to get more brave. Add a little excitement to the yard. Kick it up a notch. So, Peaches readers, I'm posting today to ask for your suggestions on how to make our landscape shine. Remember, we are a young family with a small business so we're definitely on a budget. Suggested plants should be native to our area and hard to kill.  I'd prefer perennials, but would consider planting some annuals in spots.  I've included some pictures and descriptions of the current landscaping for you to view and ponder.  Don't hold back. 
The front of the house, facing east.  We have 2 globe blue spruces (one on each side of the steps) and eight holly bushes out front.  On the northeast corner (the right side of the picture) we have a young red dogwood tree and three hydrangea bushes.  I'd really like to add some color and line the front walk.  

This is the side of the house, facing north, from the street.  We absolutely hate this side of the  house and have no idea what to do with it.  It is hard to see in this pictures, but we have 3 summer wine ninebark and 3 viburnum planted on this side of the house.  I also have some creeping phlox around the AC unit.  As you can see on the right side of the picture, we have a gravel rainbow drive and a fence line on this side of the house.  We also have a lot of yard to work with on this side of the house.  I'm thinking more shrubs, color, maybe some bushes or trees that will be pretty in the fall???
This is the south side of the house taken from the southeast corner of the front yard.  This side of the house isn't very visible from the street, so we'll probably keep it simple here.  There are some daffodils and some sort of lilies that I keep trying to dig up but just won't die.  The brown things are mums I planted last fall.  This is my second shot at planting mums.  Hoping they'll come back this time, but it isn't looking good.  You can't see them here, but there are 3 hydrangea bushes planted along the lattice on the south side of the porch.

4.07.2011

Secret Window Repair?

Kendra is out of town at a conference for a couple days, leaving me home with the kids. Now that the kids are in bed, I have a bit of free time. Since Kendra's not around to say "no," I have an overwhelming urge to start a home improvement project that will sit, unfinished, for several months.  In particular, I think I should pull out this window's sashes and trim to refinish/repair it:


See the cracked window in the upper sash that the previos owner scotch-taped(!)? The broken sash cords? Missing putty? Peeling paint? Okay, you probably can't see that because it's a pretty crappy picture, but trust me that this window is a mess--and in a prominent location in our living room, to boot. This thing's got to be fixed, but it's likely to take a few months to find the time to do everything that needs to be done. So I'll put it to a vote; should I tear into the window while Kendra's gone?

Should I tear out this window?


3.31.2011

Rub A Dub Dub!

The new tub is finished:
A mere 5 weeks after announcing we were almost finished, we finally got around to tiling the new tub surround.  This was my first tile project; I figured that I could figure it out on my own, but I had a better plan in mind.  I was able to convince good friend Steve Schaefer, owner of Steve Schaefer Flooring in Jefferson City, to make the drive to Lathrop to give me a hand.  

Yeah, this was a pretty simple job for Steve.
With Steve's help, "we" were able to get all the tile onto the wall in a few hours, including fixing the major hump that was in one of the walls.  Steve did most of the work, while I was the designated tile cutter.  

The next evening, I grouted the joints and applied a sealant recommended by Steve.  Next up was caulking the inside corners and the tile perimeter.  Once that was done, I did my best to texture the new, unfinished part of the wall to match the old.  Kendra and I are very pleased with the final* product:


*Ok, it's not quite final yet, since we need to paint the wall.  But it's close enough.

I think our end result looks good, and also blends well with the character of the house.  I think the color of the tile (dubbed "lemon chiffon" by American Olean, the tile manufacturer) has an arts and crafts touch, and the radius tile we used on the built-out wall (on the right side of the picture) adds to the traditional feel of the tile.  

Overall, we are very pleased at how the new tub turned out.  It wasn't fast--and it wasn't cheap, even though we did most of the work ourselves--but the "before" and "after" difference is enormous.  The only problem?  With the new tub/shower in place, it makes us want to continue with the remodel of the bathroom, including a new vanity, countertop, and custom-built linen closet.