11.29.2007

Hell Hath No Fury...

In the last post, Joe described our low morale and Max's meltdown last weekend. He was kind to me, but should probably be ashamed of himself for blaming the meltdown on the baby. I'm the one who had the meltdown.

For those of you who haven't had the pleasure of painting trim (and I was among you just a few short weeks ago), let me tell you--it sucks. It's the kind of thing you should leave to the experts and exactly the kind of thing that I would like to have hired done but with two mortgages, my accountant (Joe) tells me there's no budget for an professional trim-painter. So I've learned to do it myself, I guess. Last weekend was my third straight painting trim, and I'm going to whine about it a little bit. At the end of each trim-painting day, my wrist (and sometimes shoulder) hurts and my back is sore from practically laying on the floor to paint baseboards. The first room (the playroom f/k/a/ Jayhawk room) was a challenge because I was painting white over BRIGHT red. The second room (the guest bedroom) was a challenge because the walls are highly textured and it was impossible to get a good line. I'm happy to report to you that, save for the windows in the guest bedroom, I think we have painted all the trim we're going to for while. And God bless Sherwin Williams paint because I think I'd still be painting the playroom trim if that paint didn't cover so well.

So I'm in an okay place with it now. But I wasn't last Friday. I was tired of painting trim and tired of it looking like crap. In the morning, Joe's brother Chris showed up while Joe finished up cutting in the living room. They decided they were going to tackle two "quick" projects--fixing the ductwork in the basement and installing the ceiling fan--before resuming painting. Even though Joe has been to the hardware store THREE TIMES for this project, he still didn't have the right stuff. So he and Chris went to the hardware store. In the meantime, Max refused to nap and I managed to get a tiny bit of trim painting done. About two hours later, Joe and Chris show up empty-handed. So they decide to put up the ceiling fan. Two hours after that, it is starting to get dark and there is still no fan. And I've been painting trim all day while giving Max two bottles, two snacks, one lunch, and attempting to put him down for at least three naps.
How many Mizzou fans does it take to install a ceiling fan?

They finally get the fan installed, but there are no lightbulbs to make sure it actually works. Max is screaming. I've had enough. So I pick up my child and threaten my poor husband and brother-in-law with their lives--I am taking the baby for a ride to put him to sleep and the ceiling fan better be working and the living room better be painted when I return. After a 30-minute ride to Plattsburg and back, Max was finally asleep and I returned to the house. All I can say is Joe and Chris must have done some speed-painting (hell hath no fury...), because the living room was painted when I returned. It looked great and the baby was asleep. I felt a little stupid about the fit I threw, but no one said anything so I didn't either. Everything worked out and my blood pressure finally went down.
Living Room "Before"


Living Room "After"

I think you'll agree , the new lighter green (Sherwin Williams, Lemongrass) makes the space seem much more open and brings out the woodwork nicely. And the ceiling fan is actually from this decade, which is a nice touch.

As you know, we didn't do any work on Saturday (go Tigers!) and we only had a few hours on Sunday, so we made them count. My Mom and Dad had Max for the morning, so I finished up the trim work (hooray!) and Joe cut in and rolled the first coat of paint on the dining room.
We still haven't figured out how to get those mirrors down, so they're staying put for now.

So here are our ambitious plans for this weekend:
  1. Put another coat of paint on the dining room
  2. Finish painting the window trim in the guest bedroom
  3. Touch up the playroom, guest bedroom, living room, dining room
  4. Fix the ducts
  5. Install a second ceiling fan
  6. Begin pulling trim off the wall in the entry OR try to strip and sand with the trim still on the walls
  7. Maybe--if we're lucky--begin painting the kitchen
It's a pretty big list, I know. Especially for two novice do-it-yourselfers like us. Are we setting ourselves up for another disappointing weekend? Or will we rally and come up with the most productive weekend ever? Tune in next week and find out.

11.27.2007

Morale Bottoms Out, and a Weekend Pick-Me-Up

With the holiday weekend, we planned to spend two full days (Friday and Sunday) working on the house. With all that time, we figured to knock out most of the remaining painting, get a ceiling fan installed, and fix the broken duct in the basement.

Good plan, terrible execution. Painting has proved to be extremely tedious. On Friday, we managed to get the living room painted (pictures to come in a later post), and that was about it. Kendra also finished some touch-up trim painting. But we definitely hit a low point on Friday. I went with my brother to pick up the duct work to finish that job, and the local hardware store doesn't carry the pieces we needed. That burned a good 1 1/2 hours. On top of everything, Max decided that he didn't really care for the lack of attention he was receiving, and had a near-meltdown. By the end of the day on Friday, we were ready to burn the house down.

But then Saturday came, and we remembered that we had tickets to the Missouri football game of our lifetime.
Your 2007 Heisman Trophy Winner, Chase Daniel.

The game was a blast, with Mizzou winning 36-28 to grab the #1 ranking in the country.

Our spirits buoyed by the big win, we were able to bounce back a little bit on Sunday. We've knocked out a lot of painting, installed a ceiling fan, and have a good plan to devote some solid hours this Friday/Saturday. We'll post some pics later this week to show the before/after on the painting.

11.20.2007

Watching Paint Dry

As Joe already mentioned, the last two weekends have been a little slow. Two weekends ago we traveled out of town for Mizzou football game, and last weekend we had an extra helper.
Max and Maggie

Our 3-month-old neice, Maggie, was with us for the day on Saturday. And we had her baptism to attend on Sunday. So the house went on the back burner for a bit, which is OK since it doesn't look like we're going to sell the city highrise and actually move to our country estate any time soon.

But I think Joe is too hard on us. We have gotten quite a bit of tedious painting (cutting in and trim work) done over the past couple of weekends. And one important task was complete when we left the house on Sunday. In fact, I would say this is THE most important task in light of the MU-KU showdown coming up on Saturday. The Jayhawk room is painted! Every trace of red and blue is gone! And from here on out we will refer that room as the playroom f/k/a the Jayhawk room. Unfortunately, the light was too low to get a good picture of the final paint job, but I took a picture of the room before I put on the last coat of trim paint. I think you'll get the idea, despite the bit of stubborn red that is still bleeding through in this pic.
Go Mizzou!

I also think Joe is too modest. He has failed to mention that, although it is slow work, he is the ultimate cut-in expert.
Exhibit A:
This is a picture of the top of the trim in the parlor, which Joe painted last weekend. Notice the perfect line and the complete lack of paint on the trim? That's the kind of craftsmanship you get when Joe's cutting in. Here, you can see him cutting in the living room WITHOUT EVEN USING ANY TAPE! CRAZY!
The moral of the story of the last two weeks is this:
Even though it can be slow and sometimes the work isn't very entertaining or sexy, we're learning every day and creating a beautiful house--our home--together with the help of our families and friends. So, dear readers, stick with us and watch the paint dry. We promise the pace will pick up soon.

11.18.2007

Duct Details

The last two weeks have seen very little work done to the house, as we've only been able to shake free a few hours each weekend. We're hoping to really get some work in over the holiday weekend, so the pace of posting should pick up a little bit.

This weekend, I went down into the basement to check the size of the air filter for the HVAC unit. When I got down there and starting looking around, however, I saw this:

The vent on the right is connected to the HVAC unit, and was blowing out warm air. The vent on the left was just sitting there, disconnected from anything. Just above the rear end of the vent on the left, I saw this:
See that fitting in the center of the picture? Yeah, that's the vent that goes straight into the parlor.

So what did we learn today, kids? Not only is there no active source of heating/cooling to the parlor, but we are also apparently heating the basement. Who knows how long these vents haven't been attached and how much money has been wasted over who-knows-how-many years to blow hot and cold air down there. Looks like I'll need to add one more project to the (growing) list, and run a new duct to the vent. I guess it's just another opportunity to expand my mad home-improvement skills.

11.14.2007

The Big One

The kitchen is not bad.

Sure the countertops and cabinets are a little dated, and I'm not necessarily in love with the green on white on cream color scheme. But it is a fairly large kitchen for an older home and it has a nice wall oven and huge pantry (don't worry, we'll be covering the multi-colored paint and replacing the door). The ceramic tile is OK, but--as you read in Joe's previous post--we plan to explore the possibility of ripping it up to expose the hardwood floors and restore them to their original glory. A complete kitchen overhaul is definitely in the longer-term plans for the house. But, for now, a little bit of paint and some new cabinet hardware will make it work. Except for two little problems: the cooktop doesn't work and there's no refrigerator.

So, honestly, the kitchen is almost completely non-workable as it stands. When we go to the house to work, we usually bring a cooler and fill it with ice to keep drinks and Max's food cold. Then we order pizza or go get Subway (and have nowhere to keep leftovers). We decided it would definitely be more convenient and probably better for our health if we had a place to keep food cool. So we needed to buy a refrigerator. And we can't really move in without a cook top, so we figured we needed to buy that, too. But what's a couple to do when they have two mortgages and one member of said couple makes a paltry salary as a grad student/teaching assistant? We opened up the Sunday paper, and it was like God had answered our prayers...
Nebraska Furniture Mart was having its biggest sale of the year! And better yet, they were offering no interest financing for 24 months AND free delivery on appliances! So we did what any young American couple would do and we went out and bought a bunch of stuff that we couldn't afford on credit.
We were automatically approved!

So, our lowest-price of the year, no interest until December 2009, free-delivery Jenn Air downdraft gas cooktop and Whirlpool stainless steel refrigerator should be arriving sometime December 6. In the meantime, we'll be running a gas line to the kitchen and praying that the new cooktop fits into the old cutout. Oh yeah--and we bought a couple of ceiling fans to replace the dated gold ones in the living room and parlor (why not, they're interest free until 2009!), so we'll be trying our hands at ceiling-fan installation, too.

11.11.2007

No Pictures, No Problem

Short post tonight -- an out-of-town trip on Saturday prevented us from working on the house until Sunday morning. Even though we just had a few hours, we managed to get the parlor painted. Here is a picture of the parlor, before painting. This shot is from the living room, past the pocket doors, and into the parlor:


We didn't bring the camera today, so there is no post-painting picture. The changes aren't too dramatic--the new color is a neutral tan color. The new color takes a little bit of the harshness out of the (previously) white walls.

While I painted in the parlor, Kendra was painting the trim in Max's playroom (the old "Jayhawk" room) white. She got one coat on, with one still to go to cover up the red that was on the trim before.

Hopefully we can shake some more time free next weekend and knock out a few more projects, and hopefully we'll remember our camera next time.

11.09.2007

To be (one of those people who paint old woodwork) or not to be?

Let me introduce you to our entry:
To get to the nitty gritty of this post, skip to the last paragraph. To read my musings about the space, read on.

The entry is a small space, so it is difficult to photograph, but hopefully you get the idea. On the left is the open front door to the home (leading to the infamous front porch) and on the right is the door to the sitting room. What you can't see is that, directly next to the door to the sitting room is a door to the living room. So, when you walk in the front door and into this little vestibule, there are two doors that lead you into different rooms of the house. I've never seen anything like this before, and it is one of those unique features of the house about which we love to speculate. At first, we thought maybe the house was a duplex at one point, but nothing else about the home seems to suggest that. Then, our structural engineer (who happens to be a family member and an old home buff) suggested that the home may have been built by a professional--maybe a doctor or lawyer--who used one of the doors (probably the one to the sitting room) as a professional entrance into his office. That makes a lot of sense, so that's what we're going with for now.

The first thing that probably jumps out at you is the bright color. I'm all for color, but this space is just to small for that kind of intensity. Our plan is to lighten it up with something pale and pretty neutral, saving color for other areas of the house. What you may not be able to appreciate is that, at some point, someone has put a GREEN stain on the beautiful woodwork/trim. I don't know why someone would do that, but I guess that's not the point. It's done now and we need to deal with it.

Obviously, green wood is not an option. So, as I see it, there are really two choices. We can paint the wood, which is probably the easiest way to go. But then we're just a couple of jerks who painted over beautiful, old, original woodwork. The other option is to strip the wood and restain it to match the rest of the house. According to everyone we've talked to, this would be a LOT of work. And probably expensive if we take the woodwork down and have it stripped by a professional. But here are our questions: Would it be worth it? Would we have to take the trim off the wall in order to strip it? If we do that, can we strip it ourselves? Is there a product out there we can use to strip the wood while leaving it on the wall? Is there anything else we can do short of a total strip and restain job?

Any ideas?

11.06.2007

Hardware Spa Day, Revisited

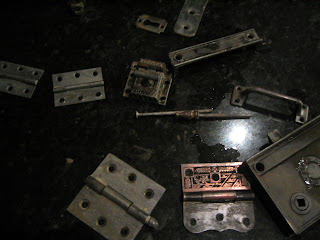
After the painted hardware enjoyed a relaxing 24-hour soak in the crockpot, I took a nylon brush and started scrubbing. I think the results speak for themselves.

Before the soak:

And after the soak:


Even though the "crockpot" method removed most of the paint, it took a little more elbow grease than I had hoped. It was pretty effective at removing newer latex paint, but older finishes were a bit more stubborn. Overall, I would recommend this as a good way to remove paint from metal without worrying about harsh chemicals. This Old House has step-by-step instructions for this procedure.

Spa Day (for Hardware)

Many of the rooms in the house have painted trim and doors (ugh). What's more, most of the time the previous owners did not remove any of the door hardware before slathering it in paint. So even though we have all these beautiful antique doorknobs, escutcheon plates, and locks, they are covered in paint.

The thought of stripping these with some type of noxious, chemical solvent wasn't very appealing to me. I decided to surf the web to see what our options were and I found some advice from this Old House. According to them, I just need to plop the hardware in a crock pot with some water and laundry soap, let it simmer overnight, and the paint will come off with some gentle brushing. I'm a little skeptical, but these guys know what they are talking about, right? The hardware from the playroom--f/k/a the Jayhawk Room--is cooking right now. I'll update y'all tonight on whether this works or not.

11.05.2007

The Post Wherein I Talk a Big Game, But Fail to Deliver

Remember last week, when I posted about my ambitious plans to remove the ceramic tile in the kitchen and take down the mirrors attached to the dining room wall? Yeah, I didn't do either of those things. Discussions with others made me realize that the ceramic tile would be difficult to remove while preserving the integrity of the underlying hardwood floor. We can live with the tile until we update the kitchen at a later date ($$$). As for the mirrors, I chickened out. I'm a little nervous about trying to remove them and the carnage the removal would inflict on our plaster walls. The mirrors are staying for now, probably until we get someone that knows what he is doing (hint: not me) to assist.

As Kendra posted below, we did get some things accomplished over the weekend. Apart from moving two carloads of clutter from the "high rise" to the "country estate," we also painted two rooms that were absolutely garish.

My big project on Saturday, however, was removing the vinyl floor from the downstairs bathroom. Our thinking was that we could remove the flooring down to the original hardwood, and then refinish if it was salvageable. If we couldn't refinish, then we'd look into options for ceramic tile. We did not want to keep the rolled vinyl that was in there. Not only is the vinyl an affront to the historical accuracy of the house, but it had a terrible faux-wood appearance.
I started by removing the toe board around the trim. Then, I cut the vinyl sheet into 2-3' strips for easy removal. It peeled up fairly easily enough, revealing a 1/4" plywood sheet underneath. The plywood was nailed to the floor, with most of the nails still covered by the bottom layer of the vinyl sheet. Since I couldn't remove the nails first, I just had to start tearing the plywood off, chunk by chunk. After I got most pieces started, I was able to pop it out in bigger chunks, so it didn't take too long. Here's what it looked like after tearing off about 60% of the plywood.
As you can see, underneath the plywood was another layer of flooring, which I assume is linoleum. My guess is that it was probably original to the home, or at least very, very old. It was in awful condition and various leaks throughout the year had taken their toll on its integrity. As you can also see from the picture, there is an active leak around the toilet, which we are hoping can be addressed by a new wax ring.
After the plywood was up, the nails were either popped out or sticking 1/4" inch above the linoleum surface. I was able to remove the remaining nails and then pry up the linoleum, which was adhered directly to the old hardwood floors.

Now, most of the bathroom floor is covered in this black adhesive that's been on the floor for decades. I need to talk to our contractor to see if this stuff can be sanded off during refinishing. If not, looks like we will be scraping/stripping this stuff ourselves.

After I removed all the linoleum I was able to check out the integrity of the hardwoods. They are sound for the most part, with the exception of a couple boards near the bathtub that have rotted. There also may be some rot near the vanity. Our hope is that these boards can be replaced and the floor refinished.

11.04.2007

Bye-Bye, Blue

It was another productive weekend at the country estate. Joe spent a large portion of the day Saturday pulling up bathroom floor (he'll be posting on that later) and Max and I were in charge of paint.
OK. We didn't actually let the 9-month-old near the paint and we tried our best to keep his developing brain away from the paint fumes. Luckily, Max's Grandma (my Mom) and Nanni (Joe's Mom) were there to help.
Back to the house...
Three of the four bedrooms in the house were various shades of blue, none of which we were very fond. Those happen to be the same three rooms that need floor refinishing. So we began painting those rooms first--before refinishing--so that any stray paint blobs can be swept away by the sander. We started with the downstairs bedroom, which will be our guest bedroom/office. It was a dark, dark shade of blue (think midnight blue or navy). A little heavy for a bedroom, so we decided to go with a light terra cotta (Sherwin Williams calls it Rustic Adobe) to open it up. The walls in the room are highly textured, so the effect, I think, is pretty good--earthy and kind of clay-like (see before and after pics below). Once the trim is repainted and the floors are refinished, I think we'll be in business.
The other room on the painting agenda this weekend, of course, was the Jayhawk room. It will be a playroom for Max, so we picked Gleeful Green. The trim will be white, but for now it is still red. Maybe we'll keep it in through the holiday season.
I know this is a super-long post, but I have to end by giving a shout-out to Joe's brother, Chris, and my brother, Kevin, for taking on painting and general clean-up duties this weekend. Thanks, bros!

11.01.2007

More Demo Work

As we've already mentioned, we spent some time pulling up old carpet to reveal the original hardwoods. We've received a bid on refinishing the 3 rooms (plus a hallway and stairs) that were previously carpeted. It's a no-brainer as an old-house-preservationist, right? You gotta pull up the carpet.

Well, we are not just stopping at carpet. Last weekend, we decided that the kitchen--which features a nice-enough ceramic tile--just doesn't look right in the context of the rest of the house. Sure enough, there is hardwood located underneath the ceramic tile, which is enough to warrant a death sentence for the tile. It's all coming up this weekend, provided we can figure out how to get it done.
Are we qualified to do this?


Same goes for the laminate flooring in the downstairs bathroom--it's coming up this weekend, too. After our weekend demolition, we should be down to hardwoods throughout the whole house, except for the back-porch-turned-laundry-room and the upstairs bathroom.

The good news is that last time we pulled up flooring, we found 12 cents, and this priceless artifact:
I can't be sure what this means, but I strongly suspect foul play. In the conservatory. By Professor Plum.

Mirrors, Mirrors, on the Wall

The dining room in the house embodies several things we love about our place. Here's a picture:


Notice the beautiful, original woodwork. The floors look great, too. The vaulted ceiling is handsome. The door to the kitchen is a double-hinged swinging door, which is kind of cool. The walls are original plaster. The window is huge and original.

And then there are the huge double mirrors hung on the wall. Bleh. Some people have told us that they like the mirrors, and they certainly make the room appear bigger. But these things have to go; they definitely don't fit the original decor of the house.

Last weekend, I was set to take them off. I unscrewed the mirror clips, thinking that the glass would just come off. The mirrors, however, are stuck to the wall. It appears that there may be some kind of backing to which the mirrors are attached. As you can see, the mirrors are huge. I was thinking of taping up the front to prevent breaking shards of glass, and then trying to chisel them off the backing or the wall. I'm pretty sure this will result in some plaster damage, but I guess we'll see. Anyone have any ideas or suggestions?